
DIY makeup brush and tool case
I went to a thrift shop to find a hardback book that had a spine that was just over an inch and I took my longest brush to make sure that I got one that would accommodate all my brushes. It cost me $3.
 Once I got the book home, I removed the contents of the bound book with an exact-o knife.
 I decided to use felt on the inside of the case. Since I didn't have to turn edges to finish them on the felt, I cut the felt to be 1/2" larger on all sides of the book. This extra fabric is needed for putting in zipper tape and stitching it in.
  The exterior fabric was a heavy canvas, I cut it to be 1" bigger than the book on all sides so that I could turn the edges to have them be finished. The poly-canvas that I used also had a rubber backing making it much heavier and more difficult to turn, especially at the corners, but I was using fabrics that I already had in my house.
  I mapped out where I wanted my elastics and used a clear plastic ruler along the steps of stitching the elastic on to make sure I was staying straight. Also, make sure that you leave plenty of elastic as a tail. You will want to pucker the elastic between stitches to hold the brushes. This will help make the most use of the real estate you have.
 Next stitch your elastic 1/2" from the edge as your anchor.
 Then lineup your brushes and map out how you want them.
 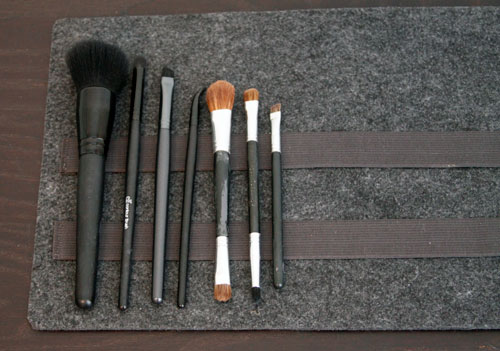 The rest of getting the elastic stitched is a little tedious, but I am so happy with the results that I encourage you to put in the time. Make sure that your brush fits without too much tension before you stitch each of them.
 You can see that I added a place for my tweezers, little scissors and a sharpener. Since this is custom, do whatever works best for you. You could do them opposite of what I have with the brushes lined up on both sides horizontally as long as your book is deep enough.
 Now take all of your tools out and put a glue on the back of your felt. I used Martha Stewart permanent glue (again I already had it). Place your felt inside the book cover and use the original pages that were removed from the cover to help set the interior. Having the original pages applies the pressure needed to set the interior piece. Set some heavy books on top and let sit for 8 or more hours.
  Do the same thing with the exterior fabric. You can do both the interior and exterior at the same time to save time.
Next insert a zipper and between the interior and exterior fabrics. I used a zipper that had a 3/4" zipper tape, and used two zipper heads, but a single would work just great too.
Here is the final product. Perfect for storage and for travel.


Genius! This makes me want to go out and buy brushes (I only have like...two).
ReplyDeleteHoly mackerel, Jacks!! This is amazing! One of these days I need you to give me some design and sewing tutorials. I really wish I could do this on my own, but I'm pretty sure it'd look really sad. Love you!
ReplyDeleteWow. Love it.
ReplyDeleteLove it Jackie! You are amazing & have so many talents. Can I come over and we can make one while I'm in job transition?
ReplyDeletedo you think you could do a description on how you got the zipper in there please? I've been on the hunt and this seems perfect for my project but the zipper part confuses me a little bit. Thank you so much! -Erica
ReplyDelete